Theme - People and Potraits
Title of Theme - Family and Friends
INTRODUCTION
Before i started my photography career, I used to work full time in a food manufacturing business, after biding my time their for a few years i acknowledged that a career in food was not an accolade of mine.Sitting at home for a few months brought nothing in the form of career oppurtunities and it was not until a friend from America
arrived that i took a giant step into pursuing a career in photography.
I had never shared an interest in photography before but i was inspired by my friends photographs and the scope of features available to enchance a simple photo.
A few months later and after money well spent on a camera and studio, i created a knack for photography ( especially portraits ) and i find my self travelling every where with my camera .
To further develop my photography skills i joined a college where i met other keen photographers and the following portfolio of photographs were taken by me as part of my first assignment.
I hope you enjoy them!
Statement of intent ( Portraits)
Intentions/purpose of the photography to be undertaken
create a collection of images based around Portrait photography. I wanted to produce portraits photos that were relaxed and informal, My aim for this theme is to create a mixture of low and high key images. The purpose of creating both low and high key images is to explore how the mood of an image changes when you adjust the light .
Reasons for selection of theme (including inspiration from the work of others)
My inspiration to shoot Portrait photography is SIMON EMMETT,You can find out more about him from my research page. The way he takes pictures is he starts with one light and adds more as he needs to, he uses more light modifiers instead of increasing the amount of lights.
I love portrait photography in studio environment because you can control everything the way you want to, I have come to the conclusion that i would like to do a mixture of high and low key images so i can distinguish between the difference in lighting .
The photo imaging equipment and medium that will be used and why .
The equipment i am using will be studio equipment at home and college .
CAMERA : Nikon D800 LENSE : 24 - 70 G Lense
Studio Lighting : Include Bowen 400 + 500 Lights, SoftBoxes, Reflectors.
Tripod .
I am capturing the images in raw format and I will set the scene on different backgrounds, there will be some image manipulation and this will be done in Nikon Nx2 and Photoshop .
Techniques that will be used and how they will help convey the visual message.
As i will be completing more than one shoot and using more than one model to produce my final images, the visual message will be different . The low key session will be low, moody and will be specifically highlighted images, Where as the high key work will be bright white and cheerfull.
How light quality can be used to help convey the visual message.
My aim is to create different low and high key sessions, this means a number of lights will be used in the setup for high key session and one light will be setup for the low key session.
Safety Considerations.
For the high key work the room will be brightly lit, So every potential hazard can be spotted.For the low key work the room will be dimly lit, So clear walkways to the door can be specified .
Research 1
Simon Emmett
is an English portrait photographer based in London, mostly known for his celebrity portraits and beauty photography.
Simon Emmett was born in England in 1969 .
Emmett does mainly portrait, celebrity, beauty, and fashion photography.
Emmett has photographed for publications such as British GQ,
Vogue Russia, Harper's Bazaar,
Velvet Magazine, L'Officiel Magazine, Grazie Magazine, Sunday Times Magazine, American Vogue,
British Vogue, French Vogue, German Vogue, Australian Vogue, Numéro,
The New York Times, Interview, and Vibe.
He has photographed celebrities such as Megan Fox, Mickey Rourke,
Orlando Bloom, Keira Knightley,
Jay-Z, Kanye West, Justin Timberlake, Cameron Diaz, Lily Allen, Sacha Baron Cohen, Dita Von Teese, Led Zeppelin, Jeremy Irons, Josh Brolin,
Tony Bennett, Pharrell Williams,
Sienna Miller, Gordon Ramsay,
Robbie Williams, Morrissey,
John Galliano, Steve Coogan,
Daniel Craig, Beyoncé, Kylie Minogue, Lily Allen, Bob Geldof and Keane
.http://www.clmus.com/photography/simon-emmett


born 1960 in Lakeland Florida is an American photographer and an author and publisher of periodicals dealing in Macintosh and Personal Computer software, specifically for design professionals, photographers, and artists.Kelby is a photographer, designer, and the award-winning author of more than 50 books, including Photoshop Down & Dirty Tricks, The Photoshop CS3 Book for Digital Photographers, The Photoshop Channels Book, Photoshop Classic Effects, The Adobe Photoshop Lightroom Book for Digital Photographers, The iPod Book, The Digital Photography Book, and The iPhone Book.
http://portfolio.scottkelby.com/


Model : ---------------


 Nikon D800 dslr Focal length 48mm Iso 400 Exposure time 1/160 sec F-stop f/11 Flash - external
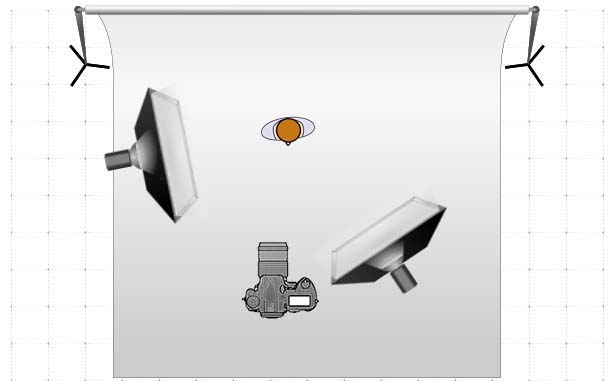

To get this portrait i placed a 5 - foot roll of white seamless paper in the background, supported by two light stands with an extender poll between them and two sandbags to keep things steady.
I used one strobe with a 36" softbox attachment and diffusion sock as the main light just in front of my subject and another one with a 24" softbox aiming up at him and filling in the shadow, the camera setting is mentioned above.
This is a beauty head shot, the focus is on the face, I shot the image in raw mode. So I'll start the processing in the view NX2 software which comes with my Nikon dslr camera.

This portrait is taken casually.
This portrait was captured by taking a casual photograph around the house. I love the natural expression in her eyes as she looked up at me while enjoying a little treat you can almost see an exitement on her face, thats what i love in this portrait. The focus is on the face, I shot the image in raw mode, So I'll start the processing in view the NX2 software which comes with my Nikon dslr camera.
is an English portrait photographer based in London, mostly known for his celebrity portraits and beauty photography.
Simon Emmett was born in England in 1969 .
Emmett does mainly portrait, celebrity, beauty, and fashion photography.
Emmett has photographed for publications such as British GQ,
Vogue Russia, Harper's Bazaar,
Velvet Magazine, L'Officiel Magazine, Grazie Magazine, Sunday Times Magazine, American Vogue,
British Vogue, French Vogue, German Vogue, Australian Vogue, Numéro,
The New York Times, Interview, and Vibe.
He has photographed celebrities such as Megan Fox, Mickey Rourke,
Orlando Bloom, Keira Knightley,
Jay-Z, Kanye West, Justin Timberlake, Cameron Diaz, Lily Allen, Sacha Baron Cohen, Dita Von Teese, Led Zeppelin, Jeremy Irons, Josh Brolin,
Tony Bennett, Pharrell Williams,
Sienna Miller, Gordon Ramsay,
Robbie Williams, Morrissey,
John Galliano, Steve Coogan,
Daniel Craig, Beyoncé, Kylie Minogue, Lily Allen, Bob Geldof and Keane
.http://www.clmus.com/photography/simon-emmett
Scott
Kelby
born 1960 in Lakeland Florida is an American photographer and an author and publisher of periodicals dealing in Macintosh and Personal Computer software, specifically for design professionals, photographers, and artists.Kelby is a photographer, designer, and the award-winning author of more than 50 books, including Photoshop Down & Dirty Tricks, The Photoshop CS3 Book for Digital Photographers, The Photoshop Channels Book, Photoshop Classic Effects, The Adobe Photoshop Lightroom Book for Digital Photographers, The iPod Book, The Digital Photography Book, and The iPhone Book.
http://portfolio.scottkelby.com/
PORTRAITS
Picture 1Model : ---------------
To get this portrait i placed a 5 - foot roll of white seamless paper in the background, supported by two light stands with an extender poll between them and two sandbags to keep things steady.
I used one strobe with a 36" softbox attachment and diffusion sock as the main light just in front of my subject and another one with a 24" softbox aiming up at him and filling in the shadow, the camera setting is mentioned above.
This is a beauty head shot, the focus is on the face, I shot the image in raw mode. So I'll start the processing in the view NX2 software which comes with my Nikon dslr camera.
Step 1 Exposure compansation ( change the exposure from 0 to 1.7 )
Step 2 White balance ( change that to auto 2 for vibrant colours
Step 3 Picture control ( change to vivid )
Step 4 D-lighting (change that to 0 to 17 ).
After finishing the retouching i have saved the image and converted it into jpg format .
Picture 2
Model : ---------------
Nikon D800 dslr Focal length 70 mm Iso 100 Exposure time 1/160sec F-stop f/2.8 Flash - Internal
This portrait was captured by taking a casual photograph around the house. I love the natural expression in her eyes as she looked up at me while enjoying a little treat you can almost see an exitement on her face, thats what i love in this portrait. The focus is on the face, I shot the image in raw mode, So I'll start the processing in view the NX2 software which comes with my Nikon dslr camera.
Step 1 Exposure compansation ( change the exposure from 0 to 0.4 )
Step 2 White balance ( change that to auto 2 for vibrant colours )
Step 3 Picture control ( change to Monochrome )
Step 4 D-lighting (change that to 0 to 16 )
After finishing the retouching i have saved the image and converted into jpg format .Picture 3
Model : ---------------

Nikon D800 dslr Focal length 56mm Iso 400 Exposure time 1/250sec F-stop f/11 Flash - external+Internal
This portrait is taken in the studio.
To get this portrait i placed a 5 - foot roll of black paper in the bakground, supported by two light stands with an extender poll between them and two sandbags to keep things steady.
I used one strobe with a a 36" softbox attachment and diffusion sock as the main light just in front of my subject and another one with a 24" softbox aiming up at him and filling in the shadow, the camera setting is mentioned above .
This is a beauty head shot, the focus is on the face, I shot the image in raw mode. So I'll start the processing in the view NX2 software which comes with my Nikon dslr camera.
Step1 Exposure compansation ( change the exposure from 0 to 1.7 )
Step 2 White balance ( change that to auto 2 for vibrant colours )
Step 3 Picture control ( change to vivid )
Step 4 D-lighting (change that to 0 to 17 )
After finishing the retouching i have saved the image and converted into jpg format .
Picture 4
Model : ---------------

Nikon D800 dslr Focal length 52mm Iso 400 Exposure time 1/200sec F-stop f/11 Flash - external
This portrait is taken in the studio.
To get this portrait i placed a 5 - foot roll of black paper in the bakground, supported by two light stands with an extender poll between them and two sandbags to keep things steady.
I used one strobe with a 36" softbox attachment and diffusion sock as main light i put this at an angle at about 65 degrees and i stood there at an angle of about 90 degrees and i used my camera flash together with the main light on my subject, the camera setting is mentioned above.
This is a beauty head shot, the focus is on the face, I shot the image in raw mode, so I'll start the processing in the view NX2 software which comes with my Nikon dslr camera.
Step 1 Exposure compansation ( change the exposure from 0 to 0.5 )
Step 2 White balance ( change that to Flash mode )
Step 3 Picture control ( change to vivid )
Step 4 Sharpness ( change that 0 to 5 )
Step 5 Contrast ( change that 0 to 9 )
After finishing the retouching i have saved the image and converted into jpg format .
Picture 5
Model : ---------------

Nikon D800 dslr Focal length 58mm Iso 100 Exposure time 1/160sec F-stop f/2.8 Flash - internal
This portrait is taken casually.
This portrait was captured taking a casual photograph around the house. I love the natural expression you can almost see an exitement on one of the boys but the other one totally ignored the scene, thats what i love in this portrait. The focus is on the face, I shot the image in raw mode, so I'll start the processing in the view NX2 software which comes with my Nikon dslr camera.
Step 1 Exposure compansation ( normal exposure )
Step 2 White balance ( auto white balance 2 )
Step 3 Picture control ( portrait )
Step 4 Sharpness change that 0 to 8 )
Step 5 D-lighting (change that to 0 to 16 )
After finishing the retouching i have saved the image and converted into jpg format .
Picture 6
Model : ---------------

Nikon D800 dslr Focal length 34mm Iso 100 Exposure time 1/160sec F-stop f/2.8 Flash - internal
This portrait is taken casually.
This portrait was captured taking a casual photograph around the house. He looks very busy playing on his mobile phone and ignored his surroundings and was oblivious to what was happening around him. Thats what i love in this portrait. The focus is on the face, I shot the image in raw mode, so I'll start the processing in the view NX2 software which comes with my Nikon dslr camera.
Step 1 Exposure compansation ( change the exposure from 0 to 0.7 )
Step 2 White balance ( change that to 5400 )
Step 3 Picture control ( change to Monochrome )
Step 4 D-lighting (change that 0 to 10 )
After finishing the retouching i have saved the image and converted into jpg format .
Picture 7
Model : ---------------

Nikon D800 dslr Focal length 52 mm Iso 100 Exposure time 1/125 sec F-stop f/11 Flash - external

This portrait is taken in the studio.
To get this portrait i placed a 5 - foot roll of black paper in the background, supported by two light stands with an extender poll between them and two sandbags to keep things steady.
In this portrait i used a three lights setup, i used one strobe with a 36" softbox attachment and diffusion sock placed on her left hand side and another one with a 24" softbox aiming up at her from above the head and a third light i used only bare strobe light from the right at an angle on her face.
The camera setting is mentioned above .
This is a beauty head shot, the focus is on the face, I shot the image in raw mode, so I'll start the processing in the view NX2 software which comes with my Nikon dslr camera.
Step 1 Exposure compansation ( change the exposure from 0 to 0.2 )
Step 2 White balance (change that to auto 1)
Step 3 Picture control ( change to monochrome )
Step 4 Sharpness ( change that 0 to 6 )
Step 5 Contrast ( change that 0 to 16 )
Step 6 Brightness ( change that 0 to -7 )
Step 7 D-lighting ( change that 0 to 16 )
After finishing the retouching i have saved the image and converted into jpg format .
Picture 8
Model : ---------------

Nikon D800 dslr Focal length 45 mm Iso 100 Exposure time 1/250sec F-stop f/14 Flash - external
This portrait is taken in the studio.
To get this portrait i placed a 5 - foot roll of white seamless paper in the background, supported by two light stands with an extender poll between them and two sandbags to keep things steady.
In this portrait i used a three lights setup, i used one strobe with a 36" softbox attachment and diffusion sock placed on her left hand side behind her and another one with a 24" softbox aiming up at her from above the head and a third light i used only bare strobe light from the right at an angle on her face.
The camera setting is mentioned above .
This is a hi key beauty head shot, the focus is on the face, I shot the image in raw, So I'll start the processing in Photoshop elements 11 software .
Step 1 Hi key ( select hi key preset press B&W and than press add diffuse glow press ok button
Step 2 White balance (change that to auto 1)
Step 3 Picture control ( change to monochrome )
Step 4 select perfect portrait and than increased contrast for clarity in the portrait
Step 5 Ad Glow by pressing ad glow button to give the portrait glamorous look
Step 6 Slim down click to slim down your subject without distortion
After finishing the retouching i have saved the image and converted into jpg format .
Picture 9
Model : --------------

Nikon D800 dslr Focal length 62 mm Iso 100 Exposure time 1/125 sec F-stop f/5.6 Flash - external
This portrait is taken in the studio.
This portrait is taken in my college when we were studing Hi-key photography, We placed a 5-foot roll of white paper in the background, fixed on the wall with an extender poll between them. As you can see in the picture above one strobe light with a reflector is facing the white background paper, and the model was sitting two meters in front of the paper. Than two strobe lights with big soft boxes were placed left and right of the model. In between both softboxes the photographer stood and took the picture, we used wireless trigers to trigger all the strobes in one go to complete this shot.
This is a beauty head shot, the focus is on the face, I shot the image in raw mode, so I'll start the processing in the view NX2 software which comes with my Nikon dslr camera.
Step 1 Exposure compansation ( change the exposure from 0 to 0.4 )
Step 2 White balance ( Auto 2 )
Step 3 Picture control ( change to vivid )
Step 4 Sharpness ( change that 0 to 7 )
Step 5 Brightness ( change that 0 to 12 )
Step 6 D-lighting (change that to 0 to 17 ).
After finishing the retouching i have saved the image and converted into jpg format .
Picture 10
Model : ---------------

Nikon D800 dslr Focal length 45 mm Iso 100 Exposure time 1/125 sec F-stop f/3.2 Flash - external
This portrait is taken in the studio.
This portrait was taken in my college when we were studying lo-key photography, As you can see in the above right within picture, the model was sitting in front of us, we covered both sides with white boards and the light was behind the photographer, so we turnes the strobe on minimum and it was triggered by a wireless key which is connected on the camera flash place. All camera settings are mentioned above.
This is a beauty head shot, the focus is on the face, I shot the image in raw mode, Ss I'll start the processing in the view NX2 software which comes with my Nikon dslr camera.
Step 1 Exposure compansation ( change the exposure from 0 to 0.4 )
Step 2 White balance ( Auto 2 )
Step 3 Picture control ( change to vivid )
Step 4 Sharpness ( change that 0 to 5 )
Step 5 D-lighting (change that to 0 to 16 ).
After finishing the retouching i have saved the image and converted into jpg format .
Picture 11
Model : ---------------

Nikon D70s dslr Focal length 48 mm Iso 100 Exposure time 1/125sec F-stop f/5.6 Flash - external
This portrait is taken in the studio.
This portrait was taken in my college when we were studying lo-key photography, As you can see in the above right within the picture the model was sitting in front of us, we covered both sides with white foam and the light was behind the photographer, we turned the strobe on minimum and it was triggered by a wireless key which is connected on the camera flash place. All camera settings are mentioned above.
This is a beauty head shot, the focus is on the face, I shot the image in raw mode, so I'll start the processing in the view NX2 software which comes with my Nikon dslr camera.
Step 1 Exposure compansation ( change the exposure from 0 to 1.2 )
Step 2 White balance ( Recorded value )
Step 3 Picture control ( change to portrait )
Step 4 Sharpness ( change that 0 to 5 )
Step 5 D-lighting (change that to 0 to 14 ).
After finishing the retouching i have saved the image and converted into jpg format .
Picture 12
Model : ---------

This portrait is taken in the studio.
To get this portrait i
placed a 5 - foot roll of Black paper in the background, supported by two light stands with an extender poll
between them and two sandbags to keep things steady.
In this portrait only the cameras internal flash is
used, the camera settings are mentioned above.
This is a beauty head shot, the focus is on the face, I
shot the image in raw mode, so I'll start the processing in view the NX2
software which comes with my Nikon dslr camera.
Step 1 Exposure compensation (
change the exposure from 0 to 0.5 )
Step 2 White balance ( change that to
auto 2 for vibrant colours
Step 3 Picture control ( change to
vivid )
Step 4 Contrast ( change that 0 to 14 )
Step 5 Brightness ( change that 0 to -5
).
After finishing the retouching i have saved the image
and converted into jpg format .
No comments:
Post a Comment